There are certain desserts that just stop you in your tracks, and this Red Velvet Cheesecake Layer Cake recipe is one of them. I still remember the first time I decided to combine my two absolute favorite desserts—the tangy, vibrant crumb of a red velvet cake and the dense, creamy perfection of a classic cheesecake. It felt like a wild idea, a dessert dream that might be too ambitious for a home kitchen. But the result was so much more than I could have hoped for: a towering, beautiful cake that elicits gasps whenever I bring it to the table. It’s the kind of cake that makes memories, perfect for big celebrations or those quiet moments when you just need something truly special.
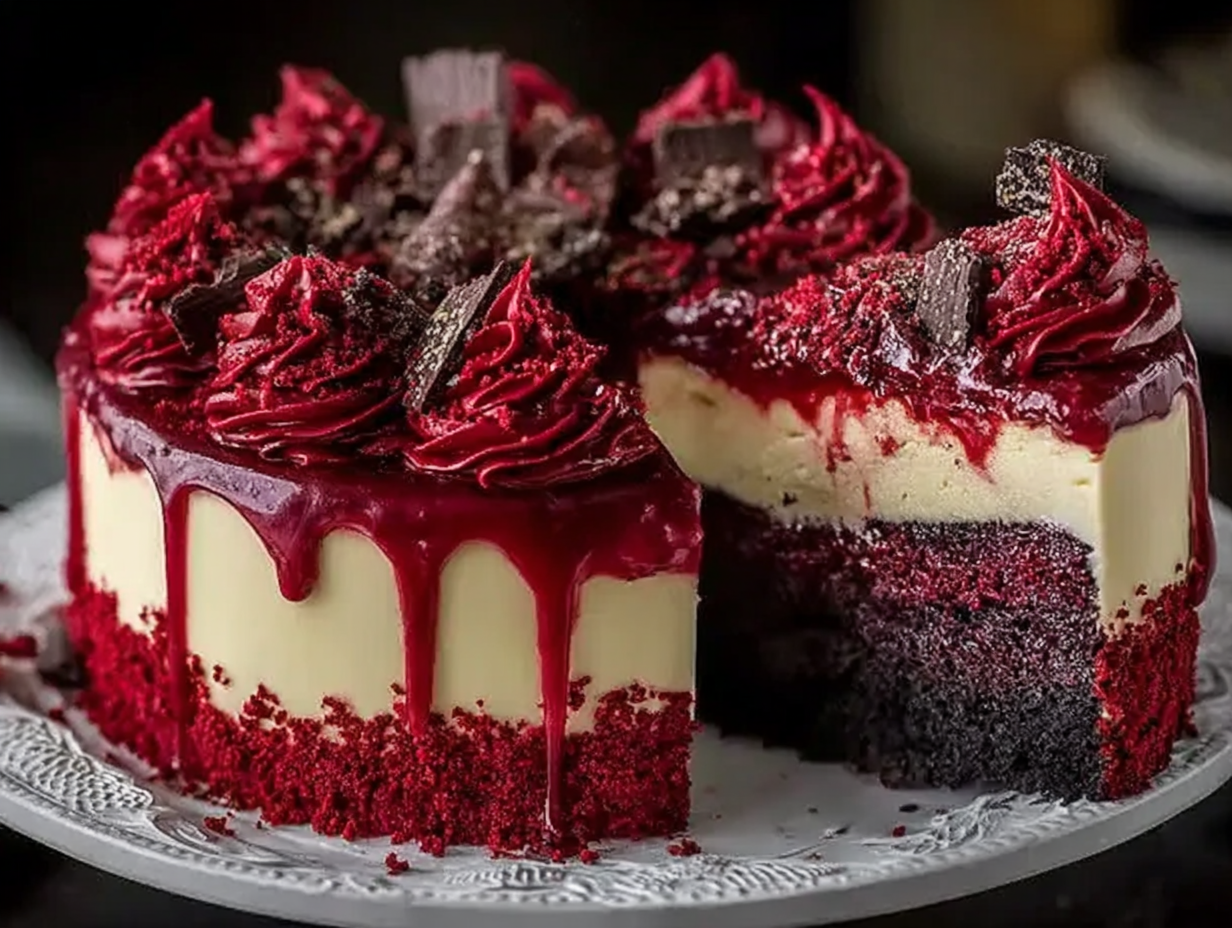
What makes this cake a true showstopper isn’t just its looks; it’s the incredible combination of textures and flavors. You get the subtle cocoa notes of the moist red velvet, the rich tang of the cheesecake, the smooth and sweet cream cheese frosting, and a bright berry glaze that cuts through the richness. It’s a project, for sure—a labor of love that takes a little time and patience. But every step, from pressing the chocolate cookie crust to piping the final swirl of frosting, is so rewarding. This has become my go-to for Christmas Cake Flavor Ideas and special Birthday Cheesecake Ideas, proving that a Cheesecake With Cake Layer is the ultimate dessert power couple. It’s more than just a cake; it’s an event.
Ingredients for Your Red Velvet Cheesecake Layer Cake
Gathering your ingredients is the first step to creating this masterpiece. I always recommend using room temperature ingredients, especially for the cheesecake and frosting, as it makes for a much smoother, more incorporated final texture. Here’s what you’ll need, broken down by component.
For the Chocolate Cookie Crust:
- 2 cups (200 g) chocolate cookie crumbs (like Oreos, filling removed)
- ½ cup (115 g) unsalted butter, melted
For the Red Velvet Cake Layers:
- 2 ½ cups (315 g) all-purpose flour
- 1 ½ cups (300 g) granulated sugar
- 2 tbsp cocoa powder
- 1 tsp baking soda
- 1 tsp baking powder
- 1 tsp salt
- 1 ½ cups (360 ml) buttermilk, room temperature
- 1 cup (240 ml) vegetable oil
- 2 large eggs, room temperature
- 2 tsp vanilla extract
- 1 tsp white vinegar
- 1–2 tbsp red gel food coloring
For the Cheesecake Layer:
- 16 oz (450 g) cream cheese, softened to room temperature
- ½ cup (100 g) granulated sugar
- 2 large eggs, room temperature
- 1 tsp vanilla extract
- ½ cup (120 ml) sour cream or heavy cream, room temperature
For the Cream Cheese Frosting & Garnish:
- 16 oz (450 g) cream cheese, softened
- 1 cup (230 g) unsalted butter, softened
- 4 cups (480 g) powdered sugar
- 2 tsp vanilla extract
- ½ cup (120 ml) strawberry or raspberry jam
- 2 tbsp water
- 1 tsp lemon juice
- Red velvet crumbs (from leveling the cakes)
- Dark chocolate chips
Step-by-Step Instructions to Bake the Perfect Cake
Take your time with each step. Baking this cake is a process, so put on some music, relax, and enjoy creating one of the best Red Desserts Ideas you’ll ever make.
- Prepare the Crust: Start by mixing your chocolate cookie crumbs with the melted butter. The texture should feel like wet sand. Press this firmly and evenly into the bottom of a 9-inch springform pan. Pop it into a 350°F (175°C) oven for about 10 minutes. Let it cool completely on a wire rack.
- Bake the Red Velvet Layers: Grease and line two 9-inch round cake pans. In a large bowl, whisk together the dry ingredients: flour, cocoa powder, baking soda, baking powder, and salt. In another bowl, combine the wet ingredients: sugar, oil, eggs, buttermilk, vinegar, vanilla, and the red gel food coloring. Pour the wet ingredients into the dry and mix until just combined—be careful not to overmix! Divide the batter between your two pans and bake for 25-30 minutes. A toothpick test will tell you when they’re done. Let them cool completely.
- Make the Cheesecake Layer: In a bowl, beat the softened cream cheese and sugar until it’s perfectly smooth. Add the eggs one by one, followed by the vanilla and sour cream. Pour this batter over your cooled cookie crust. Bake at 325°F (160°C) for 40-45 minutes. The center should have a slight jiggle. Let it cool completely, then chill it in the fridge for at least 4 hours, but preferably overnight.
- Assemble Your Masterpiece: Once everything is completely cool, it’s time to build your cake. Place one red velvet layer on your serving plate. Spread a thin layer of cream cheese frosting over it. Carefully place the chilled cheesecake layer on top. Add another thin layer of frosting, then top with the second red velvet layer. Frost the entire cake with the remaining cream cheese frosting.
- Decorate and Serve: For the glaze, gently warm the jam, water, and lemon juice in a small saucepan until it’s pourable. Let it cool for a few minutes, then drizzle it over the top of the cake, letting it drip down the sides. Get creative with the decorations! Use leftover frosting for piping, sprinkle on some cake crumbs from leveling the layers, and add a handful of dark chocolate chips. This is one of those Velvet Cakes that deserves a grand finish.
Tips & Tricks for a Flawless Red Velvet Cheesecake Layer Cake
Making a layer cake of this magnitude can feel intimidating, but a few key tips can make all the difference between a good cake and a great one. Over the years, I’ve learned that the secret to success with this Red Velvet Cheesecake Layer Cake recipe lies in patience and paying attention to the details. First and foremost, do not rush the cooling process. Each component—the red velvet layers and the cheesecake—must be completely chilled before you even think about assembling. A warm cake will melt the frosting, and a slightly cool cheesecake can crack or slide. I usually bake everything one day and assemble the next. This breaks up the work and ensures everything is firm, cold, and ready for stacking.
Another crucial area is the texture of your batters. For the red velvet layers, the instruction to “mix just until combined” is vital. Overmixing develops the gluten in the flour, which can lead to a dense, tough cake instead of the light, fluffy crumb we’re aiming for. For the cheesecake, the goal is to avoid incorporating too much air. That’s why you should use softened cream cheese and add the eggs one at a time, mixing on low speed. Excess air creates bubbles that can cause cracks as the cheesecake bakes and cools. Speaking of cracks, baking the cheesecake in a water bath (placing the springform pan inside a larger pan with hot water) can help it bake more evenly and prevent cracking, though simply not overbaking it is the most effective method.
Assembling Your Masterpiece Without Stress
When it comes to assembly, a crumb coat is your best friend. After stacking the layers, apply a very thin layer of frosting all over the cake and then chill it for about 30 minutes. This initial layer traps any loose crumbs, so your final coat of frosting will be pristine and beautiful. This is especially helpful for Valentine Cakes Ideas, where a perfect finish feels extra important. Also, if your red velvet cake layers have domed tops, use a serrated knife to carefully level them before stacking. This creates a stable, flat surface for the cheesecake layer to rest on and prevents a wobbly final product. Save those trimmed-off pieces! They make the perfect crumb decoration.
FAQ: How do I get my cream cheese frosting so smooth?
The key to ultra-smooth cream cheese frosting is using truly softened butter and cream cheese. I take them out of the fridge at least an hour before I start. Also, be sure to sift your powdered sugar to remove any lumps. Beat the butter and cream cheese together first until they are light and fluffy before gradually adding the sifted powdered sugar. If it seems too stiff, you can add a tablespoon of milk or heavy cream to get the perfect spreading consistency.
Substitutions and Variations on This Red Velvet Cheesecake Recipe
One of the best things about this Red Velvet Cheesecake Layer Cake recipe is how adaptable it is. While the classic combination is a showstopper, you can easily tweak it to fit your tastes or dietary needs. For instance, if you don’t have buttermilk on hand, you can easily make a substitute by adding one tablespoon of white vinegar or lemon juice to regular milk and letting it sit for about 10 minutes. It creates the same acidity that gives red velvet its signature tang and tender crumb. This recipe is a fantastic base for exploring different Red Velvet Cake Flavor Combinations. Try adding a teaspoon of espresso powder to the red velvet batter to deepen the chocolate notes, or swap the vanilla extract for almond extract in the cheesecake for a subtle, nutty twist.
For a gluten-free version, you can successfully substitute the all-purpose flour with a good-quality 1-to-1 gluten-free baking blend. Just be sure to use a blend that contains xanthan gum. For the crust, simply use your favorite gluten-free chocolate cookies. The frosting is another area ripe for experimentation. A white chocolate cream cheese frosting would be incredibly decadent, or you could fold in some crushed peppermint candies for a festive twist, making it a perfect dessert for your December Food menu. The berry glaze can also be changed up; a tart cherry glaze or a rich dark chocolate ganache would be equally delicious and visually stunning.
FAQ: Can I make this cake with a different crust?
Absolutely! While the chocolate cookie crust is a classic pairing, you could easily use a graham cracker crust, a crust made from Biscoff cookies, or even a nut-based crust with pecans or walnuts. The method remains the same: mix the crumbs with melted butter and press it into the pan. This is a simple way to change the flavor profile of this versatile Red Dessert and make it your own.
Frequently Asked Questions
How do I properly store the Red Velvet Cheesecake Layer Cake?
Because of the cheesecake layer and cream cheese frosting, this cake must be stored in the refrigerator. Keep it in an airtight cake container or loosely covered with plastic wrap. It will stay fresh and delicious for up to 4-5 days. For the best flavor and texture, I recommend letting a slice sit at room temperature for about 20-30 minutes before serving.
Can I use a different type of food coloring?
I highly recommend using a concentrated gel food coloring. Liquid food coloring from the grocery store is much less potent, and you would need to add a significant amount to achieve a vibrant red, which could alter the consistency of the cake batter. Gel colors give you that deep, classic red velvet hue without thinning out the batter.
Is it necessary to use a springform pan for the cheesecake?
A springform pan is strongly recommended for the cheesecake layer. Its removable sides make it possible to get the delicate cheesecake out without flipping it or risking damage. If you don’t have one, you could bake the cheesecake in a regular 9-inch cake pan that has been very well-greased and lined with parchment paper, leaving an overhang to use as “handles” to lift it out once it’s fully chilled.
A Final Slice: Enjoying Your Creation
There you have it—the complete guide to creating an unforgettable Red Velvet Cheesecake Layer Cake recipe. I truly believe that baking should be a joyful and rewarding experience, and this cake is the epitome of that. It’s a project, yes, but one that results in a dessert that’s as fun to make as it is to eat. Seeing the distinct, beautiful layers come together and then sharing the final product with people you love is a feeling that never gets old. It’s the perfect centerpiece for a holiday table and one of my favorite Christmas Cake Flavor Ideas.
Every slice is a perfect symphony of tangy, sweet, creamy, and moist. It’s a celebration in and of itself. So please, try this recipe. Don’t be afraid to make it your own with different decorations or flavor tweaks. Pour yourself a cup of coffee, cut a generous slice, and savor the moment. I hope this cake brings as much happiness to your kitchen as it has to mine. Happy baking!

Red Velvet Cheesecake Layer Cake
Ingredients
Equipment
Method
- Prepare the Crust: Start by mixing your chocolate cookie crumbs with the melted butter. The texture should feel like wet sand. Press this firmly and evenly into the bottom of a 9-inch springform pan. Pop it into a 350°F (175°C) oven for about 10 minutes. Let it cool completely on a wire rack.
- Bake the Red Velvet Layers: Grease and line two 9-inch round cake pans. In a large bowl, whisk together the dry ingredients: flour, cocoa powder, baking soda, baking powder, and salt. In another bowl, combine the wet ingredients: sugar, oil, eggs, buttermilk, vinegar, vanilla, and the red gel food coloring. Pour the wet ingredients into the dry and mix until just combined—be careful not to overmix! Divide the batter between your two pans and bake for 25-30 minutes. A toothpick test will tell you when they’re done. Let them cool completely.
- Make the Cheesecake Layer: In a bowl, beat the softened cream cheese and sugar until it’s perfectly smooth. Add the eggs one by one, followed by the vanilla and sour cream. Pour this batter over your cooled cookie crust. Bake at 325°F (160°C) for 40-45 minutes. The center should have a slight jiggle. Let it cool completely, then chill it in the fridge for at least 4 hours, but preferably overnight.
- Assemble Your Masterpiece: Once everything is completely cool, it’s time to build your cake. Place one red velvet layer on your serving plate. Spread a thin layer of cream cheese frosting over it. Carefully place the chilled cheesecake layer on top. Add another thin layer of frosting, then top with the second red velvet layer. Frost the entire cake with the remaining cream cheese frosting.
- Decorate and Serve: For the glaze, gently warm the jam, water, and lemon juice in a small saucepan until it’s pourable. Let it cool for a few minutes, then drizzle it over the top of the cake, letting it drip down the sides. Get creative with the decorations! Use leftover frosting for piping, sprinkle on some cake crumbs from leveling the layers, and add a handful of dark chocolate chips.