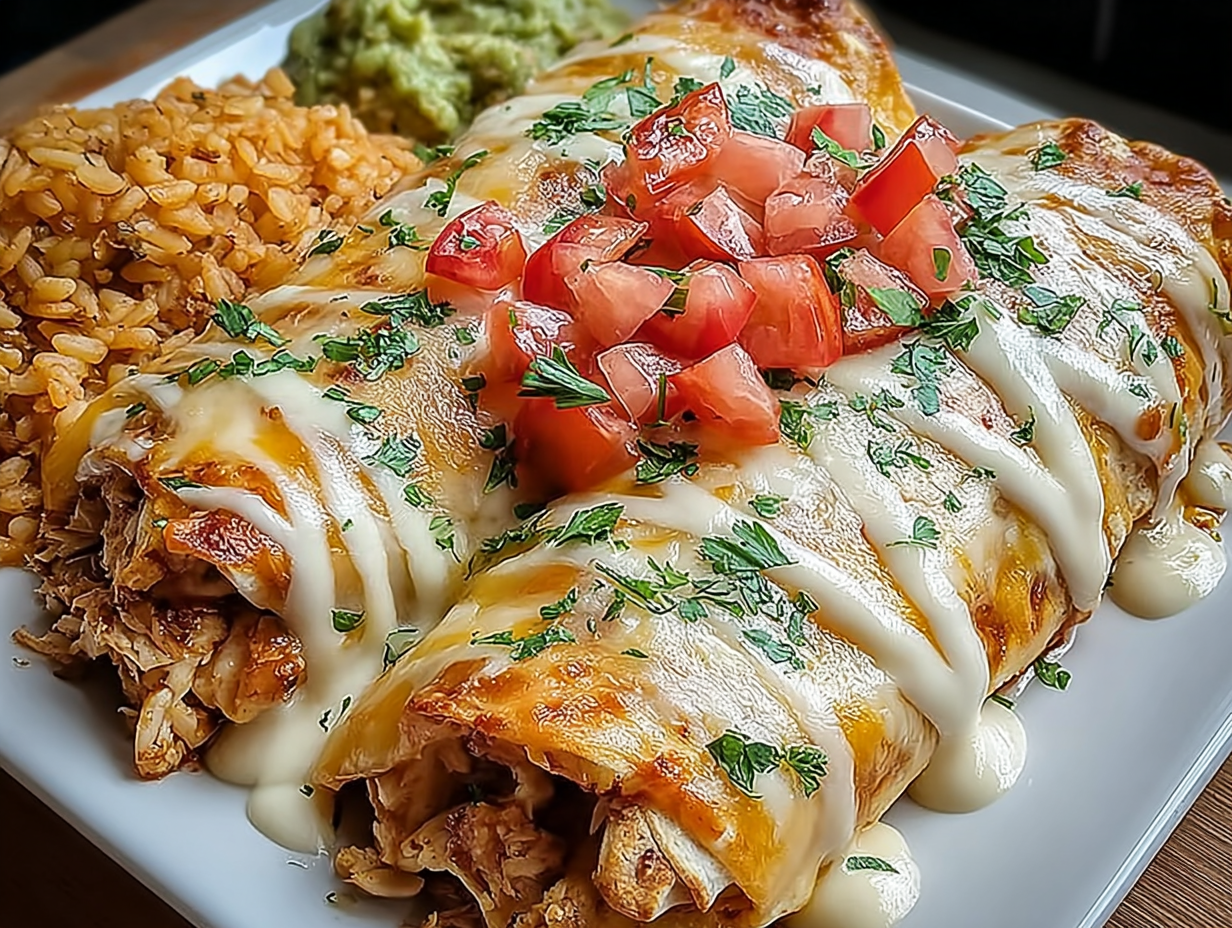
There are some weeknights when the usual rotation just won’t cut it. You know the ones—when you’re tired, the day has been long, and you need something that feels like a warm hug on a plate. That’s when I turn to these Queso Chicken Enchiladas. This isn’t just another dinner; it’s a full-on comfort experience, a dish that instantly makes the evening feel a little more special. The magic is in the creamy, velvety queso sauce that smothers tender, seasoned chicken all wrapped up in soft tortillas. It’s the kind of meal that silences a hungry table and gets you those little nods of appreciation from the whole family.
What makes this recipe a staple in my home is how it delivers such an Indulgent flavor with surprisingly little effort. It’s one of those amazing quick recipes that tastes like you spent hours in the kitchen. Using a rotisserie chicken is my favorite shortcut, cutting down prep time dramatically without sacrificing taste. This dish is incredibly family-friendly; you can adjust the spice level to please everyone, from toddlers to heat-seekers. It’s more than just a recipe; it’s a reliable go-to for creating a moment of pure, cheesy delight on even the most chaotic of evenings. This is true Comfort Food at its finest.
Ingredients for Queso Chicken Enchiladas
- Shredded Chicken: 3 cups. A rotisserie chicken is a fantastic time-saver here.
- Taco Seasoning: 1 packet. Feel free to use a homemade blend if you prefer to control the salt and spice.
- Sour Cream: 1 cup. This adds a lovely creaminess to the filling. Greek yogurt is a great substitute.
- Shredded Cheddar Cheese: 2 cups. You can also use Monterey Jack, a Mexican blend, or pepper jack for a kick.
- Chopped Green Chilies: 1 (4-ounce) can. For a milder dish, you can omit these.
- Velveeta: 16 oz, cubed. This is the secret to the ultra-smooth, creamy queso sauce.
- Diced Tomatoes with Green Chilies: 1 (10-ounce) can, undrained. Ro-Tel is the classic choice.
- Tortillas: 8 pieces. Flour tortillas are easiest to roll, but corn or whole-wheat work well too.
Step-by-Step Instructions
- Preheat and Prep: First things first, get your oven preheating to 375°F (190°C). Grab a 9×13 inch baking dish and give it a light coat of cooking spray. This little step will make serving and cleanup so much easier later.
- Mix the Chicken Filling: In a medium bowl, combine the shredded chicken, taco seasoning, sour cream, 1 cup of the shredded cheddar cheese, and the can of chopped green chilies. Stir it all together until everything is well combined. This is the hearty, flavorful core of your enchiladas.
- Warm and Fill Tortillas: To make the tortillas easy to roll without cracking, warm them up. You can wrap the stack in a damp paper towel and microwave for about 30-45 seconds. Spoon a generous amount of the chicken mixture down the center of each tortilla, then roll it up snugly and place it seam-side down in your prepared baking dish.
- Create the Queso Sauce: In a saucepan over medium-low heat, combine the cubed Velveeta and the entire can of diced tomatoes with green chilies (don’t drain it!). Stir frequently until the Velveeta is completely melted and the sauce is smooth and creamy. This is the liquid gold that makes these enchiladas so Indulgent.
- Assemble the Enchiladas: Pour that beautiful queso sauce evenly over the top of all the rolled tortillas in the baking dish. Use a spatula to make sure every nook and cranny is covered.
- Add More Cheese and Bake: Sprinkle the remaining 1 cup of shredded cheddar cheese over the top of the sauce. Slide the dish into your preheated oven and bake for 20-25 minutes, or until the sauce is bubbly and the cheese is melted and slightly golden. The aroma alone is worth it!
- Rest and Serve: Let the enchiladas rest for about 5 minutes after you pull them from the oven. This helps them set up a bit. Garnish with fresh cilantro, a dollop of sour cream, or sliced jalapeños if you like, and serve warm.
Tips for the Best Queso Chicken Enchiladas
Making great enchiladas is easy, but a few small tricks can take them from good to absolutely unforgettable. These are the little things I’ve learned over the years that guarantee a perfect, bubbly pan of cheesy goodness every time. First and foremost, don’t skip warming your tortillas. Cold tortillas, especially corn ones, are prone to cracking and falling apart when you try to roll them. A quick zap in the microwave or a few seconds in a warm, dry skillet makes them pliable and cooperative. This simple step ensures your enchiladas look as good as they taste and hold all that delicious filling inside.
Another key to success lies in the queso sauce. The goal is a perfectly smooth, creamy texture. The best way to achieve this is with low and slow heat. Don’t be tempted to crank up the burner to melt the cheese faster. High heat can make the cheese separate or become grainy. Just keep the heat on medium-low and stir patiently. It will melt into a velvety sauce that coats the enchiladas beautifully, making this one of those quick recipes that still feels luxurious. These little details are what transform a simple meal into real Comfort Food.
How do I prevent my enchiladas from getting soggy?
Soggy enchiladas are a common worry, but easily avoided. Besides warming the tortillas, you can give them a very quick flash-fry in a bit of hot oil before filling. This creates a slight barrier that helps them stand up to the sauce. If you want to skip the frying, just be sure not to let the assembled enchiladas sit in the sauce for too long before baking. Assemble and bake right away for the best texture.
Substitutions and Variations
One of the best things about this Queso Chicken Enchiladas recipe is how adaptable it is. You can easily tweak it to fit your family’s tastes or use what you have on hand. It’s a wonderful base for culinary creativity, making it a truly family-friendly meal. Don’t hesitate to play around with the ingredients to make this dish your own. Whether you’re looking for a healthier option or a new flavor profile, there are plenty of simple swaps you can make.
Ingredient Alternatives
- For the Chicken: Leftover shredded pork or seasoned ground beef are fantastic substitutes for chicken. For a vegetarian option, you could use a mixture of black beans, corn, and sautéed onions and peppers.
- For the Cheese: While Velveeta is key for the classic queso texture, you can make a sauce from scratch with shredded Monterey Jack, evaporated milk, and a little cornstarch. In the filling, feel free to use any good melting cheese you like.
- For a Healthier Twist: Substitute the sour cream with plain Greek yogurt for a protein boost. You can also use whole-wheat tortillas and a reduced-fat cheese to lighten things up without sacrificing flavor.
Flavor Variations
Want to change up the flavor? Try adding a can of drained black beans or corn to the chicken filling for extra texture and fiber. For a smokier taste, add a half teaspoon of smoked paprika or a chopped chipotle pepper in adobo sauce to the chicken mixture. You can also stir a half-cup of your favorite salsa into the queso sauce for an extra layer of flavor.
Frequently Asked Questions
Can I make these Queso Chicken Enchiladas ahead of time?
Absolutely! This is a great recipe for meal prep. You can assemble the entire dish, cover it tightly with foil, and refrigerate it for up to 24 hours. When you’re ready to eat, you may need to add about 10-15 minutes to the baking time since you’re starting with a cold dish.
How do I store and reheat leftovers?
Store any leftover enchiladas in an airtight container in the refrigerator for up to 3-4 days. The best way to reheat them is in the oven at 350°F until warmed through, which helps keep the texture from getting soggy. You can also reheat individual portions in the microwave.
Can I freeze these enchiladas?
Yes, this dish freezes beautifully. Assemble the enchiladas in a freezer-safe baking dish, but don’t bake them. Cover tightly with a layer of plastic wrap and then a layer of foil. They can be frozen for up to 3 months. You can bake from frozen, covered with foil, for about an hour before uncovering for the last 15 minutes, or thaw overnight in the fridge before baking as directed.
Conclusion
There is something incredibly satisfying about pulling a pan of these bubbly, golden-brown Queso Chicken Enchiladas from the oven. It’s more than just a meal; it’s a promise of a delicious, comforting evening. This recipe has become a cherished part of our dinner rotation because it consistently delivers that Indulgent, restaurant-quality flavor without any fuss. It’s proof that quick recipes can still be packed with love and feel special. I hope you and your family enjoy this slice of cheesy heaven as much as we do. It’s a perfect reminder that sometimes the best Comfort Food is the kind you can make on a busy Tuesday night.

Queso Chicken Enchiladas
Ingredients
Equipment
Method
- Preheat and Prep: First things first, get your oven preheating to 375°F (190°C). Grab a 9×13 inch baking dish and give it a light coat of cooking spray. This little step will make serving and cleanup so much easier later.
- Mix the Chicken Filling: In a medium bowl, combine the shredded chicken, taco seasoning, sour cream, 1 cup of the shredded cheddar cheese, and the can of chopped green chilies. Stir it all together until everything is well combined. This is the hearty, flavorful core of your enchiladas.
- Warm and Fill Tortillas: To make the tortillas easy to roll without cracking, warm them up. You can wrap the stack in a damp paper towel and microwave for about 30-45 seconds. Spoon a generous amount of the chicken mixture down the center of each tortilla, then roll it up snugly and place it seam-side down in your prepared baking dish.
- Create the Queso Sauce: In a saucepan over medium-low heat, combine the cubed Velveeta and the entire can of diced tomatoes with green chilies (don’t drain it!). Stir frequently until the Velveeta is completely melted and the sauce is smooth and creamy. This is the liquid gold that makes these enchiladas so Indulgent.
- Assemble the Enchiladas: Pour that beautiful queso sauce evenly over the top of all the rolled tortillas in the baking dish. Use a spatula to make sure every nook and cranny is covered.
- Add More Cheese and Bake: Sprinkle the remaining 1 cup of shredded cheddar cheese over the top of the sauce. Slide the dish into your preheated oven and bake for 20-25 minutes, or until the sauce is bubbly and the cheese is melted and slightly golden. The aroma alone is worth it!
- Rest and Serve: Let the enchiladas rest for about 5 minutes after you pull them from the oven. This helps them set up a bit. Garnish with fresh cilantro, a dollop of sour cream, or sliced jalapeños if you like, and serve warm.