There’s something magical about a recipe that feels both nostalgic and brand new all at once. That’s exactly the feeling I get when I make these incredible Pink Oreo Cheesecake Cookies. They have the familiar, beloved crunch of Oreos and the rich, tangy flavor of cheesecake, all wrapped up in a soft, chewy, perfectly pink cookie. This isn’t just another cookie recipe; it’s a showstopper that’s surprisingly simple to pull off, making it a go-to for special occasions or just a Tuesday when you need a little something sweet. These are the cookies that get rave reviews every single time, and the vibrant pink hue makes them an absolute dream for Valentine’s Day, baby showers, or any celebration that needs a pop of color.
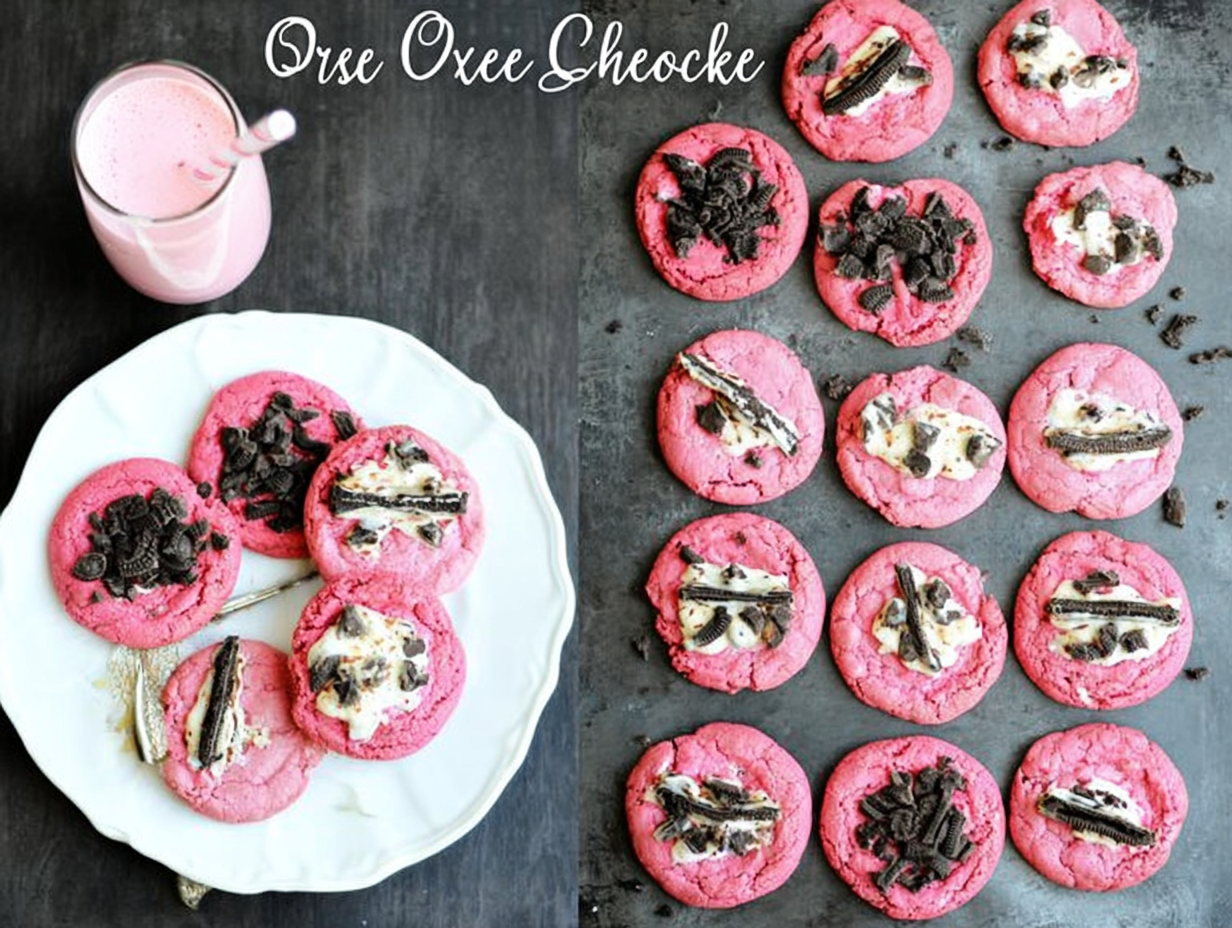
What I love most about these Oreo Cheesecake Cookies is how they deliver that complex, decadent cheesecake flavor without any of the fuss of actually making a cheesecake. The secret is using cream cheese right in the dough, which creates an unbelievably moist and tender texture that practically melts in your mouth. We’re also using a clever shortcut to get that perfect pink color and strawberry flavor without any extra hassle. With just six simple ingredients, you can create a dessert that looks like it came from a high-end bakery. It’s the kind of recipe that builds confidence in the kitchen and proves that you don’t need a long list of complicated ingredients to make something truly special and delicious.
Ingredients for Oreo Cheesecake Cookies
One of the best parts about this recipe is its simplicity. You don’t need to raid the entire baking aisle to get started. With just six core ingredients, you can create these stunningly delicious cookies. Each component plays a crucial role in building that perfect cheesecake-like texture and flavor. The cream cheese is the star, providing the signature tang and incredible moistness that sets these cookies apart from any other. It’s what gives them that dense, yet soft, bite. The cake mix acts as a fantastic shortcut, providing the flour, sugar, and leavening all in one, plus the beautiful pink color and a subtle hint of strawberry that pairs wonderfully with the chocolatey Oreos.
When you’re gathering your ingredients, make sure your cream cheese and egg are at room temperature. This is a small step that makes a huge difference. Room temperature ingredients blend together much more smoothly, preventing a lumpy batter and ensuring a uniform, tender crumb in your finished cookies. For the Oreos, you can crush them as finely or as coarsely as you like. I prefer a mix of smaller crumbs and larger chunks to get both flavor and texture in every bite. This simple list is all it takes to create a truly memorable dessert that tastes like it took hours to prepare.
- 1 (8-ounce) block cream cheese, softened
- 1 large egg, at room temperature
- 1/4 cup vegetable oil
- 1 (15.25-ounce) box strawberry cake mix
- 12 Oreo cookies, coarsely crushed
- 1/2 cup powdered sugar, for rolling
Can I use low-fat cream cheese?
For the best results, I highly recommend using full-fat, block-style cream cheese. The lower-fat versions or the whipped cream cheese sold in tubs contain more water and stabilizers, which can negatively affect the texture of the cookies, potentially making them spread too much and lose that dense, chewy quality we’re aiming for.
Step-by-Step Instructions
Making these Oreo Cheesecake Cookies is a straightforward process, perfect for bakers of all skill levels. The key to success is in the mixing and chilling. We start by combining the wet ingredients until they are perfectly smooth. In a large bowl, use an electric mixer to beat the softened cream cheese until it’s light and fluffy, with no lumps remaining. This initial step is vital for that creamy cheesecake texture. Once the cream cheese is smooth, beat in the egg and vegetable oil until they are just combined. You want to avoid overmixing here, as incorporating too much air can cause the cookies to become cakey rather than chewy.
Next, we’ll add the dry ingredients. With the mixer on low speed, gradually add the strawberry cake mix to the wet ingredients, mixing until just a few streaks of flour remain. Then, switch to a spatula and gently fold in the crushed Oreo pieces. Be careful not to overmix the dough once the Oreos are in; you want to maintain those nice chunks of cookie. The resulting dough will be very soft and sticky, which is exactly what you want. This is where the most important step comes in: chilling. Cover the bowl with plastic wrap and refrigerate the dough for at least 60 minutes. This step is non-negotiable! Chilling solidifies the fats in the dough, preventing the cookies from spreading too much in the oven and making the sticky dough much easier to handle.
- Prep Your Station: Preheat your oven to 350°F (175°C) and line two baking sheets with parchment paper.
- Mix Wet Ingredients: In a large mixing bowl, beat the softened cream cheese with an electric mixer until completely smooth. Add the egg and oil and mix on low speed until just combined.
- Add Dry Ingredients: Gradually add the strawberry cake mix to the wet mixture, mixing on low until a soft dough forms. Use a rubber spatula to fold in the crushed Oreo cookies.
- Chill the Dough: Cover the bowl and refrigerate for at least one hour. This step is crucial for preventing the cookies from spreading too much.
- Form the Cookies: Place the powdered sugar in a small bowl. Scoop out rounded tablespoons of chilled dough and roll them into balls. Roll each ball in the powdered sugar to coat completely.
- Bake: Place the coated dough balls about 2 inches apart on the prepared baking sheets. Bake for 12-14 minutes, or until the edges are set and the centers look slightly underdone.
- Cool: Let the cookies cool on the baking sheets for 5 minutes before transferring them to a wire rack to cool completely. They will firm up as they cool.
Tips & Tricks for Perfect Oreo Cheesecake Cookies
Over the years, I’ve learned a few things that take these cookies from good to absolutely perfect. First and foremost, don’t skip the chilling time. I know it’s tempting to rush, but this hour in the fridge is what gives the cookies their signature thick and chewy texture. A warmer, stickier dough will spread into thin, crispy discs, and you’ll lose that delightful cheesecake-like center. If your kitchen is particularly warm, you might even want to pop the dough in the freezer for about 20-30 minutes instead. This also makes the dough infinitely easier to roll into neat little balls without creating a huge mess.
Another tip is to use a cookie scoop. This isn’t just for looks; using a scoop ensures that all your cookies are the same size, which means they will all bake evenly. No more trays with some cookies perfectly baked and others either raw in the middle or burnt on the edges. A 1.5-tablespoon scoop is the perfect size for this recipe. Finally, be generous when rolling the dough balls in powdered sugar. This coating does more than just add a touch of sweetness; it helps create that beautiful crinkle effect on top as the cookies bake and spread. It also helps prevent the outside from browning too quickly, keeping the cookies perfectly pink and pretty.
Why are my cookies not soft?
The most common culprit for hard cookies is overbaking. These cookies are meant to be very soft in the center. They will look slightly underdone when you pull them from the oven, but they will continue to set up on the hot baking sheet as they cool. Trust the process and pull them out when the edges are just set. Overmixing the dough after adding the cake mix can also develop too much gluten, resulting in a tougher cookie.
Substitutions & Variations
While the pink strawberry version is perfect for Valentine’s Day, this Oreo Cheesecake Cookies recipe is incredibly versatile and can be adapted for any occasion. The easiest way to change things up is by swapping the cake mix. A red velvet cake mix is a fantastic choice for Christmas or a more classic flavor profile. For a rich, decadent treat, try a chocolate fudge or devil’s food cake mix. A lemon cake mix would be wonderful for a springtime dessert, pairing beautifully with Golden Oreos instead of the classic chocolate ones. Each variation creates a completely new cookie experience, so feel free to experiment with your favorite flavors.
You can also get creative with the mix-ins. If you’re not a fan of Oreos or just want to try something different, consider folding in about a cup of white chocolate chips, chopped macadamia nuts, or even freeze-dried raspberries for an extra burst of flavor and texture. For an extra decorative touch, you can press a few extra Oreo chunks or white chocolate chips onto the tops of the dough balls right before baking. This makes them look even more irresistible. Don’t be afraid to make this recipe your own; it’s a wonderfully forgiving base for all sorts of delicious combinations.
Can I make these gluten-free?
Yes, you can adapt this recipe to be gluten-free. Simply substitute the regular cake mix with a gluten-free strawberry cake mix (or another flavor of your choice) and use gluten-free sandwich cookies in place of Oreos. The baking time and method should remain the same, but always check for doneness as gluten-free flours can sometimes bake a little differently.
Frequently Asked Questions
How do I store these Oreo Cheesecake Cookies?
Because of the cream cheese in the dough, these cookies should be stored in an airtight container in the refrigerator. They will stay fresh and soft for up to 5 days. You can serve them chilled straight from the fridge or let them sit at room temperature for about 15-20 minutes to soften up a bit.
Can I freeze the cookie dough?
Absolutely! This dough freezes beautifully. After mixing, roll the dough into balls (you can skip the powdered sugar for now) and place them on a parchment-lined baking sheet. Freeze until solid, then transfer the dough balls to a freezer-safe zip-top bag. They can be frozen for up to 3 months. When you’re ready to bake, you can bake them directly from frozen. Just roll them in powdered sugar and add an extra 2-3 minutes to the baking time.
Why did my cookies spread so much?
The number one reason for excessive spreading is not chilling the dough long enough. The dough needs to be firm and cold when it goes into the oven. Another possibility is that your butter or cream cheese was too soft, almost melted, rather than just at room temperature. Also, be sure to bake on parchment paper, not a greased cookie sheet, as the extra grease can encourage spreading.
The Perfect Treat for Sharing
There you have it—a simple, yet incredibly impressive recipe for Pink Oreo Cheesecake Cookies that is sure to become a new favorite. The joy of this recipe isn’t just in the delicious final product, but in the ease of the process. It’s a fun and festive bake that’s perfect for sharing with people you love. Seeing the smiles on their faces when they take that first bite of a soft, tangy, Oreo-studded cookie is truly the best reward. This is more than just a dessert; it’s a way to add a little sweetness and color to any day.
I encourage you to give these cookies a try, whether it’s for a special holiday or just to brighten up your week. Don’t be afraid to experiment with different flavors and make the recipe your own. Baking should be about creativity and enjoyment, and these Oreo Cheesecake Cookies are the perfect canvas for that. Be sure to save this recipe, share it with a friend, and let me know how yours turn out!

Pink Oreo Cheesecake Cookies
Ingredients
Equipment
Method
- Prep Your Station: Preheat your oven to 350°F (175°C) and line two baking sheets with parchment paper.
- Mix Wet Ingredients: In a large mixing bowl, beat the softened cream cheese with an electric mixer until completely smooth. Add the egg and oil and mix on low speed until just combined.
- Add Dry Ingredients: Gradually add the strawberry cake mix to the wet mixture, mixing on low until a soft dough forms. Use a rubber spatula to fold in the crushed Oreo cookies.
- Chill the Dough: Cover the bowl and refrigerate for at least one hour. This step is crucial for preventing the cookies from spreading too much.
- Form the Cookies: Place the powdered sugar in a small bowl. Scoop out rounded tablespoons of chilled dough and roll them into balls. Roll each ball in the powdered sugar to coat completely.
- Bake: Place the coated dough balls about 2 inches apart on the prepared baking sheets. Bake for 12-14 minutes, or until the edges are set and the centers look slightly underdone.
- Cool: Let the cookies cool on the baking sheets for 5 minutes before transferring them to a wire rack to cool completely. They will firm up as they cool.