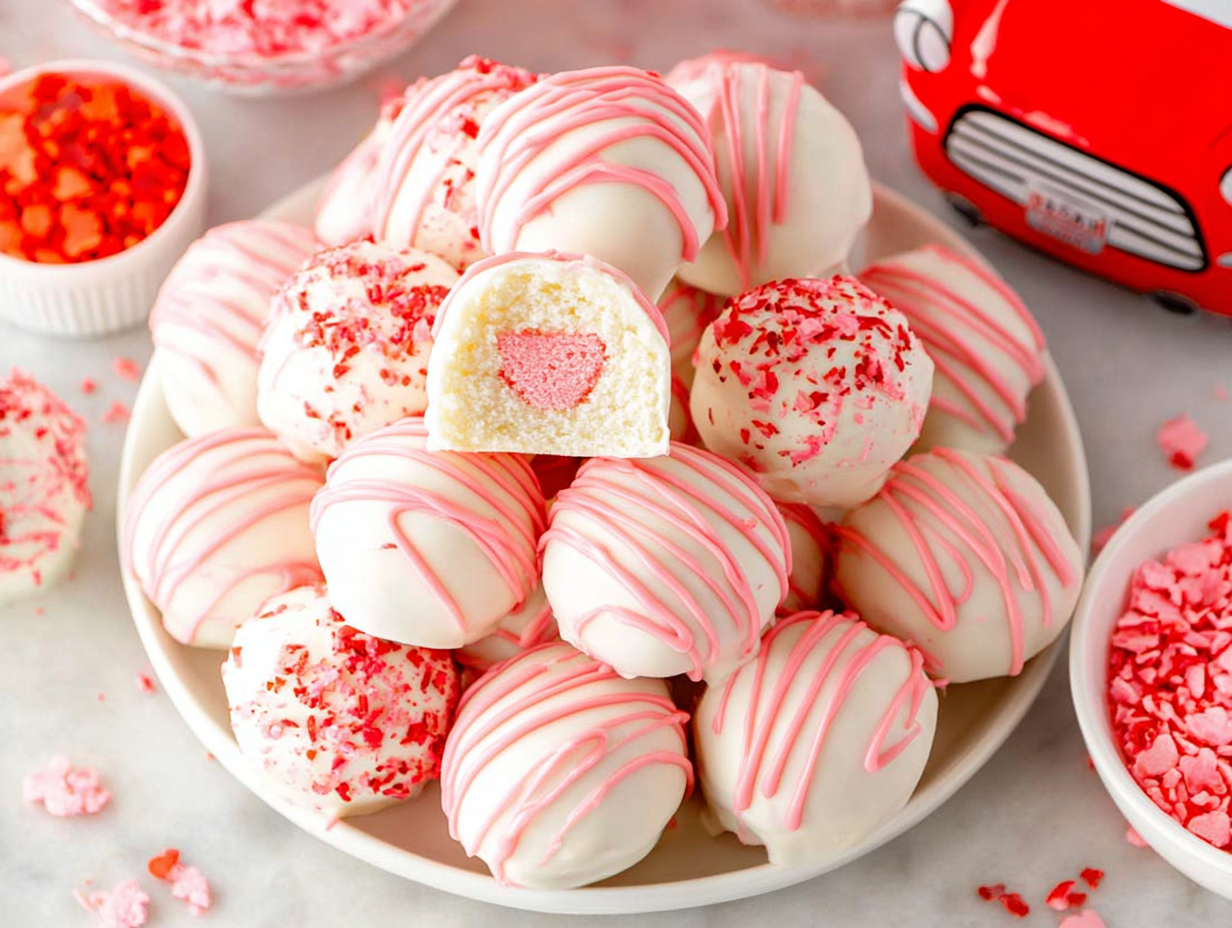
There’s something so special about creating a treat that looks like it came straight from a fancy bakery, but only you know the secret: it was incredibly simple. That’s the magic of these Strawberry Cheesecake Balls. They have become my go-to recipe for any occasion that calls for a little something sweet and pink, especially Valentine’s Day. The first time I made them, I was shocked that a box of cake mix and a block of cream cheese could transform into something so decadent. The creamy, tangy cheesecake filling bursts with strawberry flavor, and the crisp white chocolate shell gives way to that perfect, melt-in-your-mouth center. It’s a little bite of pure happiness.
What I love most about this recipe is its simplicity, making it a fantastic choice for a relaxed afternoon of baking or even a fun project to do with kids. You don’t need any special baking skills to achieve a beautiful result. The process is straightforward, from toasting the cake mix (a crucial step for safety and flavor!) to rolling the dough and dipping the balls in silky melted chocolate. Whether you’re making a batch for a party, a bake sale, or just a sweet surprise for someone you love, these little treats are guaranteed to impress. They are one of my favorite Easy Casserole Recipes for dessert that always gets rave reviews and requests for the recipe.
Ingredients for Strawberry Cheesecake Balls
The beauty of this recipe lies in its short and accessible ingredient list. You don’t need a pantry full of complicated items to create these delightful cheesecake balls. The core of the recipe is the brilliant combination of strawberry cake mix and cream cheese, which creates a surprisingly authentic cheesecake flavor and texture without any of the fuss of a traditional baked cheesecake. The white chocolate chips folded into the filling add a lovely little textural surprise and a boost of creamy sweetness. For the coating, high-quality white chocolate melting wafers are your best friend. They melt down smoothly and set with a beautiful, glossy finish that’s much easier to work with than standard white chocolate chips, which can be prone to seizing. The pink candy melts are purely for that fun, decorative drizzle, but they add a huge visual punch that makes these treats look extra special. Don’t forget the sprinkles if you want to add a final touch of festive sparkle!
- 1 (15.25 oz) box strawberry cake mix (I used Betty Crocker)
- 8 ounces cream cheese, softened to room temperature
- ⅓ cup white chocolate chips, roughly chopped
- 20 ounces Ghirardelli white chocolate melting wafers
- ½ cup Wilton pink candy melts
- ½ cup Wilton bright pink candy melts
- Sprinkles (optional)
Step-by-Step Instructions
Following these steps will give you perfect, bakery-worthy strawberry cheesecake balls every time. We’ll start by heat-treating the cake mix, which is an essential food safety step since we aren’t baking it in a batter. Then we’ll mix our simple cheesecake dough, let it chill, and then move on to the fun part: rolling and dipping! Take your time with the dipping process; it can be a little messy, but the results are so worth it. Using a fork to lift the balls out of the melted chocolate is a great trick for letting the excess drip off easily, giving you a clean, even coating. This process is a great example of how simple Chicken Dishes Recipes can be when you break them down into manageable steps.
- First, let’s get the oven ready. Set it to 350°F and grab a baking sheet lined with parchment paper.
- Spread the dry strawberry cake mix in an even layer on the baking sheet. Bake it for just 5 minutes to heat-treat it. Once done, pull it from the oven and let it cool down completely on a wire rack. Don’t skip the cooling!
- While the cake mix cools, put your softened cream cheese into a medium bowl. Use a hand mixer on medium-high speed to beat it until it’s perfectly smooth and creamy with no lumps.
- Add the cooled cake mix to the cream cheese. I like to fold it in a few times with a spatula first to prevent a pink dust cloud, then switch to the hand mixer to combine everything until you have a thick, dough-like consistency.
- Gently fold in the chopped white chocolate chips with your spatula until they’re evenly distributed.
- Cover the bowl with plastic wrap and pop it in the refrigerator to chill for at least 2 hours. This step is key for making the dough firm enough to roll.
- Once chilled, prepare two more baking sheets with parchment paper. Use a medium cookie scoop to portion the dough, dropping the scoops onto the baking sheets. Roll each portion between your palms to create smooth, even balls. Let them sit at room temperature for about 15 minutes; this helps prevent the chocolate coating from cracking later.
- In a microwave-safe bowl, melt the white chocolate wafers. Heat them in 30-second intervals, stirring well between each one, until the chocolate is completely smooth and fluid.
- Now for the dipping! Working one at a time, drop a cheesecake ball into the melted white chocolate. Use a fork to roll it around and lift it out, gently tapping the fork on the side of the bowl to let any excess chocolate drip off. Place the coated ball on the parchment-lined baking sheet.
- Continue with the remaining balls, making sure to leave about 2 inches of space between them. If you’re using sprinkles, add them now before the chocolate has a chance to set.
- For the decorative drizzle, place the two shades of pink candy melts into separate small, microwave-safe piping bags. Microwave them on a low setting in short bursts until they are fully melted.
- Snip a tiny bit off the tip of each piping bag and drizzle the melted pink chocolate over the coated cheesecake balls.
- Let everything set completely at room temperature or in the fridge until the chocolate is firm. Then, they’re ready to enjoy!
Tips & Tricks for Perfect Strawberry Cheesecake Balls
Over the years, I’ve learned a few things that take these strawberry cheesecake balls from good to absolutely amazing. First and foremost, don’t skip chilling the dough. Two hours is the minimum. If the dough is too warm, it will be sticky and impossible to roll into smooth balls. A properly chilled dough makes the whole process cleaner and easier. When it comes to melting the chocolate, patience is your friend. Using a lower power setting on your microwave or sticking to short 20-30 second intervals prevents the chocolate from scorching, ensuring a silky-smooth coating. If your chocolate seems too thick for dipping, you can stir in a tiny amount (about half a teaspoon) of coconut oil or vegetable shortening to thin it out. This little trick makes getting a thin, even coat much simpler. It’s a technique that works well for many dessert Chicken Recipes Casserole.
Another game-changing tip involves the rolling and dipping process itself. After you roll the chilled dough into balls, let them rest on the counter for about 15 minutes. This slight temperature adjustment helps prevent the cold dough from causing the warm chocolate coating to crack as it sets—a common frustration! For dipping, using a fork or a dedicated chocolate dipping tool is far superior to a spoon. It allows the excess chocolate to drip away cleanly, so you don’t end up with a thick, uneven base on your finished cheesecake ball. Finally, have fun with the decoration! If you don’t have piping bags, you can simply use a spoon to flick the melted pink chocolate across the balls for a more abstract, artistic drizzle. The goal is to have fun and create a treat that you’re excited to share.
Why did my chocolate coating crack?
This is a common issue! Cracking usually happens due to a drastic temperature difference between the very cold cheesecake balls and the warm melted chocolate. When the chocolate sets rapidly on the cold surface, it can contract and crack. To avoid this, let your rolled balls sit at room temperature for 15-20 minutes before dipping them. This small step allows the surface temperature to rise just enough to prevent that shocking temperature change, resulting in a smooth, flawless finish.
Substitutions & Variations
While the strawberry version is a classic, this recipe is a fantastic template for all sorts of flavor experiments. Think of it as a base, much like a simple Arroz Con Pollo that you can customize. The most obvious swap is the cake mix. A lemon cake mix would create a delicious strawberry-lemonade flavor, while a chocolate cake mix would result in a decadent chocolate-covered strawberry cheesecake ball. You could even try a Funfetti cake mix and mix in extra sprinkles for a birthday-themed treat. The possibilities are nearly endless, so feel free to browse the cake aisle for inspiration.
You can also get creative with the coatings and mix-ins. Instead of white chocolate chips inside, try mini dark chocolate chips or finely chopped nuts like pecans or macadamia nuts for added crunch. For the outer shell, milk chocolate or dark chocolate melting wafers work beautifully and offer a different flavor profile. You could also tint your white chocolate with oil-based food coloring to create any color you desire. For decoration, go beyond sprinkles! A sprinkle of flaky sea salt on a dark chocolate-coated ball, a dusting of freeze-dried strawberry powder, or a sprinkle of finely chopped pistachios can add a touch of elegance and a new layer of flavor. This adaptability makes it one of the most versatile Easy Casserole dessert recipes you can have.
Can I make these gluten-free?
Yes, you absolutely can! To make gluten-free strawberry cheesecake balls, simply substitute the regular strawberry cake mix with your favorite brand of gluten-free strawberry cake mix. The rest of the ingredients are naturally gluten-free, but it’s always a good practice to double-check the labels on your chocolate chips and sprinkles to ensure they were produced in a gluten-free facility if cross-contamination is a concern.
Frequently Asked Questions
Do I really have to heat-treat the cake mix?
Yes, this is a very important step for food safety. Raw flour, and by extension, raw cake mix, can contain harmful bacteria like E. coli. Since we aren’t fully baking the mixture, briefly toasting it in the oven for 5 minutes is enough to kill off any potential pathogens, making your cheesecake balls perfectly safe to eat.
How should I store these Strawberry Cheesecake Balls?
Because of the cream cheese filling, these treats need to be refrigerated. Store them in an airtight container in the refrigerator for up to one week. The chocolate shell will keep them fresh and prevent them from drying out.
Can I make them ahead of time?
Definitely! These are a great make-ahead dessert. You can make them completely 1-2 days in advance and store them in the fridge. You can also prepare the dough, roll it into balls, and store the uncoated balls in an airtight container in the freezer for up to a month. When you’re ready, just thaw them in the fridge before dipping them in chocolate.
Conclusion
I hope you have as much fun making—and eating—these Strawberry Cheesecake Balls as I do. They are truly one of the simplest yet most impressive treats in my recipe collection. There’s a special kind of joy in watching someone’s eyes light up when they take their first bite, discovering that creamy, flavorful center inside the crisp chocolate shell. It’s a reminder that you don’t need complicated recipes to create moments of pure delight. This is more than just a dessert; it’s a perfect little project for a quiet afternoon and a wonderful gift to share with people you care about. It’s an Angel Chicken of a dessert, truly sent from above. So go ahead, give this recipe a try, and be sure to save or share it for your next special occasion!

Strawberry Cheesecake Balls
Ingredients
Equipment
Method
- Preheat the oven to 350°F and line a baking sheet with parchment paper.
- Spread the dry strawberry cake mix in an even layer on the baking sheet. Bake for 5 minutes to heat-treat it. Let it cool completely on a wire rack.
- In a medium bowl, beat the softened cream cheese with a hand mixer on medium-high speed until smooth and creamy.
- Add the cooled cake mix to the cream cheese and mix with the hand mixer until a thick, dough-like consistency forms.
- Fold in the chopped white chocolate chips with a spatula.
- Cover the bowl and refrigerate for at least 2 hours to firm up the dough.
- Line two more baking sheets with parchment paper. Use a medium cookie scoop to portion the dough, then roll each portion into a smooth ball. Let the balls sit at room temperature for about 15 minutes.
- Melt the white chocolate wafers in a microwave-safe bowl in 30-second intervals, stirring in between, until smooth.
- Dip each cheesecake ball into the melted white chocolate, using a fork to lift it out and allow excess chocolate to drip off. Place on the parchment-lined baking sheet.
- Add sprinkles immediately after dipping, if using, before the chocolate sets.
- Melt the two shades of pink candy melts in separate microwave-safe piping bags using short bursts on a low setting.
- Snip the tips of the piping bags and drizzle the melted pink chocolate over the coated cheesecake balls.
- Let the cheesecake balls set completely at room temperature or in the refrigerator until the chocolate is firm.